Skip to content
  • Categories
  • Recent
  • Tags
  • Popular
  • Users
  • Groups
Collapse

Kakakuona Forum

SamohS

Samoh

@Samoh
About
Posts
5
Topics
4
Groups
0
Followers
0
Following
0

Posts

Recent Best Controversial

  • SocGholish: A JavaScript evil downloader puts Visitors at risk
    SamohS Samoh

    Description

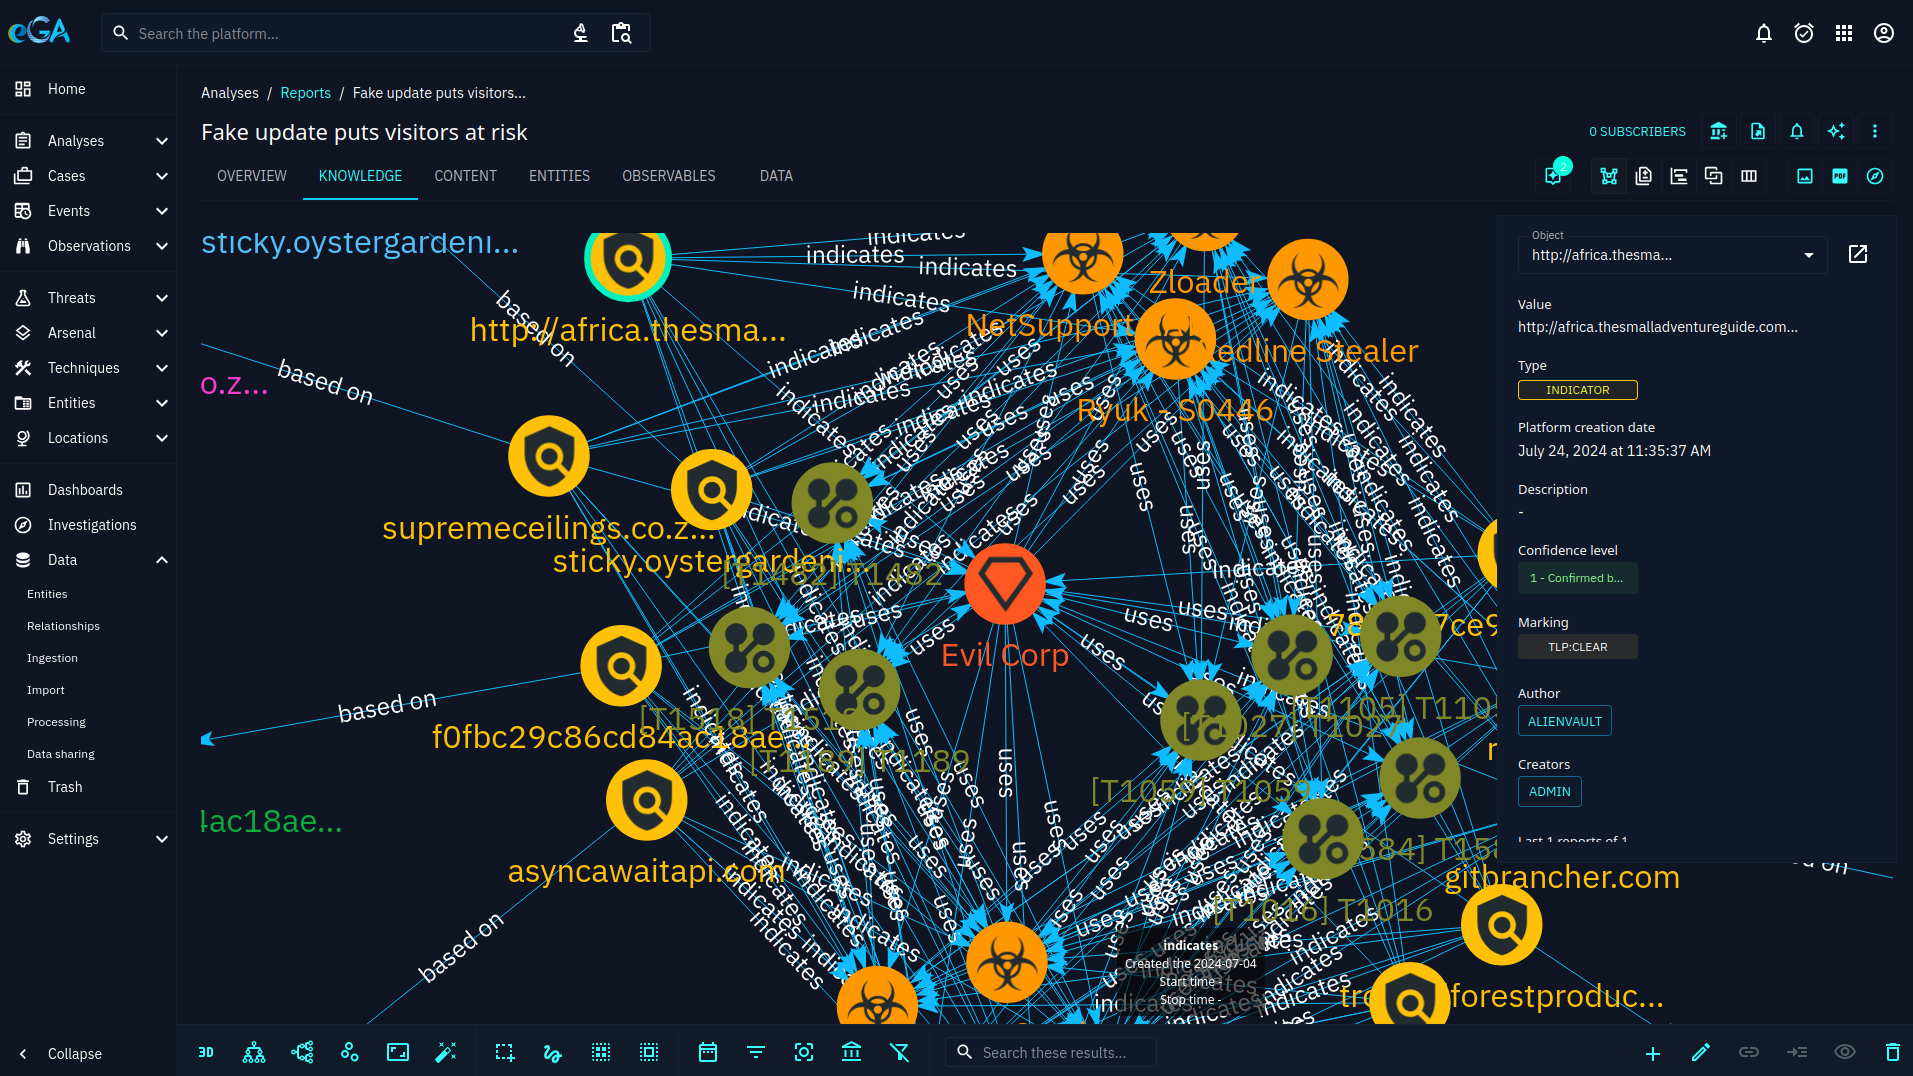
    This intelligence report discusses SocGholish, a JavaScript downloader used by threat actors to deliver malware payloads disguised as fake browser updates. It analyzes the recent tactics, techniques, and procedures employed by threat groups like Evil Corp in compromising WordPress websites, fingerprinting user profiles, and directing victims to malicious domains hosting the fake updates. The report also explores potential payloads delivered through SocGholish, such as Cobalt Strike, Zloader, information stealers, remote access trojans, and ransomware.

    Screenshot from 2024-07-27 14-25-01.png

    In the ever-evolving landscape of cybersecurity, SocGholish stands out as a particularly insidious threat. This JavaScript-based malware framework has been active since at least 2017 and it's persistence and adaptability make it a significant concern for both individuals and organizations.

    What is SocGholish?

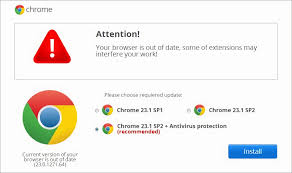
    Also known as FakeUpdates, SocGholish, is a JavaScript downloader malware typically distributed through compromised websites that masquarade as legitimate software update pages. When unsuspecting users visit these sites, they are tricked into downloading and executing malicious files, often in the form of .zip or .js files.

    How SocGholish Work?

    The primary method of distribution for SocGholish is through drive-by downloads. These downloads occur when users visit compromised websites that have been injected with malicious JavaScript. The script prompts users to download what appears to be a critical browser update. Once the user downloads and executes the file, the malware is installed on their system.

    bfd88fc1-e254-493b-af6a-311f6014821b-image.png b5a15f5d-9e48-4109-8568-4f8024bdc69c-image.png

    Once this malware is installed, SocGholish can download additional malware, including remote access trojans (RATs), information stealers and ransomware. This males it a versatile tool for cybercriminals who can use it to gain initial access to a system and then deploy other malicious payloads.

    Techniques and Tactics

    SocGholish employs several sophisticated techniques to evade detection and ensure successful infection:

    1. Domain Shadowing: Attackers use legitimare domains to host their malicious content, making it harder for security systems to detect the threat.
    2. Obfuscation: The JavaScript code is often obfuscated to prevent easy analysis and detection by security tools.
    3. Masquerading: The malware files are named to mimic legitimate software updates, increasing the likelihood that users will downlaod and execute them.

    Impact and Associations

    SecGholish has been linked to several high-profile cyberattacks and is often associated with ransomware groups like EvilCorp. It has also been used in conjunction with other malware campaigns, making it a significant threat in the cybercrime ecosystem.

    Protecting Against SocGholish

    To protect against SocGholish and similar threats, consider the following best practices:

      1. Regular Software Updates: Ensure that all software, especially browsers and plugins are kept up to date with the latest security patches from trusted sources.
      1. Use Security Software: Employ reputable antivirus and anti-malware solutions that can detect and block malicious scripts.
      1. Educate Users: Train users to recognize phishing attempts and the dangers of downloading software from untrusted sources.
      1. Monitor Network Traffic: Keep an eye on the network traffic for unusual activity that could indicate a compromise.
      1. Reputable/Verified Browser Extensions: Avoid using untrusted or unverified browser extensions.

    Conclusion

    SocGholish is a reminder of the constant vigilance required in the digital age. By understanding how this malware operates and taking proactive steps to secure systems, individuals and organizations can better protect themselves against this persistent threat.

    Stay safe and stay informed!

    More on SocGholish

    https://www.gdatasoftware.com/blog/2024/07/37976-socgholish-fake-update
    https://blog.sucuri.net/2022/08/socgholish-5-years-of-massive-website-infections.html
    https://blog.sucuri.net/2024/03/new-wave-of-socgholish-infections-impersonates-wordpress-plugins.html
    https://attack.mitre.org/software/S1124/
    https://www.checkpoint.com/cyber-hub/threat-prevention/what-is-malware/socgholish-malware/


  • Understanding CVE-2024-0044: A High-Severity Android Vulnerability
    SamohS Samoh

    Android Improper Input Validation: A possible Run-As any app leading to a potential local privilege escalation without user interaction.

    d7b8099a-31ce-4e28-ae6d-29a04351a5f0-image.png

    Introduction

    In the ever-evolving landscape of cybersecurity, staying informed about the latest vulnerabilities is crucial. One such vulnerability that has recently come to light is CVE-2024-0044. This high-severity vulnerability affects Android versions 12 and 13, posing significant risks to users and developers alike.

    What is CVE-2024-0044?

    CVE-2024-0044 is a vulnerability identified in the createSessionInternal function of the PackageInstallerService.java file. This vulnerability arises due to improper input validation, which can lead to a “run-as any app” attack. Essentially, this means that an attacker can exploit this flaw to gain unauthorized access to sensitive data and perform unauthorized actions on the affected device.

    Technical Details

    The vulnerability allows for local escalation of privilege without requiring user interaction. This is particularly concerning because it means that an attacker can exploit the vulnerability without any additional execution privileges. The issue stems from the improper handling of input within the createSessionInternal function, which can be manipulated during the session creation process.

    Impact

    The potential impact of CVE-2024-0044 is significant. By exploiting this vulnerability, an attacker can gain elevated privileges on the affected device, allowing them to access sensitive information, modify system settings, and potentially install malicious software. This can lead to severe consequences for users, including data breaches and loss of personal information.

    Mitigation and Recommendations

    To mitigate the risks associated with CVE-2024-0044, it is essential to apply the latest security patches provided by Android. Users should ensure that their devices are updated to the latest version to protect against this vulnerability. Additionally, developers should review their code for similar input validation issues and implement best practices to prevent such vulnerabilities in the future.

    Is your device affected with CVE-2024-0044 ?

    To check if your Android device is affected by CVE-2024-0044, you need to verify your device’s security patch level. Here’s how you can do it:

    1. Open Settings: Go to the Settings app on your Android device.
    2. Scroll Down and Select About Phone: This option is usually at the bottom of the settings menu, or My phone > Android Version > Android security update
    3. Find Android Version: Tap on “Android Version” or “Software Information”.
    4. Check Security Patch Level: Look for the “Android security patch level” date.

    If your device has a security patch level of March 2024 or later, it should be protected against CVE-2024-0044.

    If your device is not up to date, you should:

    • Update Your Device: Go back to the main settings menu, select “System Update” or “Software Update”, and check for updates.
    • Install Available Updates: Follow the prompts to download and install any available updates.

    Keeping your device updated is crucial for protecting against vulnerabilities like CVE-2024-0044.

    References

    https://rtx.meta.security/exploitation/2024/03/04/Android-run-as-forgery.html

    https://nvd.nist.gov/vuln/detail/CVE-2024-0044

    https://www.mobile-hacker.com/2024/06/17/exfiltrate-sensitive-user-data-from-apps-on-android-12-and-13-using-cve-2024-0044-vulnerability/

    Exploit Proof of Concept (PoC)

    PoC code is written by security researchers to demonstrate that the vulnerability can be exploited. PoC code is also a key component for weaponization which could lead to ransomware

    https://github.com/scs-labrat/android_autorooter
    
    https://github.com/pl4int3xt/cve_2024_0044
    
    https://github.com/007CRIPTOGRAFIA/C-CVE-2024-0044
    

  • How to install PostgreSQL on Ubuntu OS With PgAdmin 4
    SamohS Samoh

    PostgreSQL, often referred to as Postgres, is a powerful open-source object-relational database system. It is known for its robustness, scalability and support for advanced data types. in this guide, i'll walk you through the steps to install PostgreSQL on an Ubuntu operating system.

    Prerequisites

    Before we begin, ensure you have the following

    • A system running Ubuntu (20.04 or later)
    • A user account with sudo priviledges (Admin priviledge in the world of Windows)
    • An internet connection

    Step 1: Update your system

    Update your package list to ensure you have the latest information on the newest versions of packages and their dependencies

    sudo apt update
    

    Step 2: Install PostgreSQL

    i. Automated repository configuration:

    sudo apt install -y postgresql-common
    sudo /usr/share/postgresql-common/pgdg/apt.postgresql.org.sh
    

    ii. Follow this steps to manually configure the APT repository. bored?{You can copy paste 🙂 }

    # Import the repository signing key
    sudo apt install curl ca-certificates
    sudo install -d /usr/share/postgresql-common/pgdg
    sudo curl -o /usr/share/postgresql-common/pgdg/apt.postgresql.org.asc --fail https://www.postgresql.org/media/keys/ACCC4CF8.asc
    
    # Create the repository configuration file:
    sudo sh -c 'echo "deb [signed-by=/usr/share/postgresql-common/pgdg/apt.postgresql.org.asc] https://apt.postgresql.org/pub/repos/apt $(lsb_release -cs)-pgdg main" > /etc/apt/sources.list.d/pgdg.list'
    
    # Update the package lists
    sudo apt update
    
    # Install the latest version of PostgreSQL
    # If you want a specific version, use 'postgresql-16' or similar instead of 'postgresql'
    sudo apt -y install postgresql
    

    Step 3: Verify the Installation

    Once the installation is complete, verify that PostgreSQL is running.

    sudo systemctl status postgresql
    

    You should see the status 'active', if not, you may need to repeat step 2

    b543e191-1f9c-4ecd-a1b6-a9932cf38608-image.png

    Yaay!, Now we have it. NOTE: To use PgAdmin 4, please skip to step 9

    Step 4: Access the PostgreSQL Command Line

    Now we need to switch to the PostgreSQL user account and access the PostgreSQL command line interface (CLI).

    sudo -i -u postgres
    # then to access the CLI
    psql
    

    You should now be at the PostgreSQL prompt (postgres=#), which looks like this (your terminal might be different 😉 )

    f2796375-9277-4413-bc1e-183725e727f4-image.png

    Step 5: Create a New Database User

    It's a good practice to create a new database user with superuser privileges for managing your databases.

    CREATE USER yourusername WITH SUPERUSER CREATEDB CREATEROLE PASSWORD 'yoursecurepassword';
    

    Replace yourusername and yourpassword with your desired username and password respectively.

    Step 6: Create a New Database

    Well, the reason you are installing this is to keep your application data at a centralized step right?

    CREATE DATABASE yourdatabase;
    

    Replace yourdatabase with your desired database name

    Step 7: Grant Privileges

    Grant all privileges on the new database to your new user (of course you should always grant necessary privileges to a user based on the needs/usage of the application, i'm just saying Lol! 🙂 )

    GRANT ALL PRIVILEGES ON DATABASE yourdatabase TO yourusername;
    

    Step 8: Exit the PostgreSQL CLI

    Exit the PostgreSQL command line interface.

    \q
    

    NOTE: This steps are for working with PostgreSQL locally, if you need to access your PostgreSQL server remotely, be free to leave a comment below.

    Installing PgAdmin 4

    Step 9: Installing PgAdmin 4 (On Ubuntu and Distros using DEB package manager)

    Install the public key for the repository (if not done previously):

    curl -fsS https://www.pgadmin.org/static/packages_pgadmin_org.pub | sudo gpg --dearmor -o /usr/share/keyrings/packages-pgadmin-org.gpg
    

    Create the repository configuration file:

    sudo sh -c 'echo "deb [signed-by=/usr/share/keyrings/packages-pgadmin-org.gpg] https://ftp.postgresql.org/pub/pgadmin/pgadmin4/apt/$(lsb_release -cs) pgadmin4 main" > /etc/apt/sources.list.d/pgadmin4.list && apt update'
    

    Install pgAdmin (NOTE: If you have Apache running and don't want to interfere with it, install pgadmin4-desktop mode only)

    o Install for both desktop and web modes:

    sudo apt install pgadmin4
    

    o Install for desktop mode only:

    sudo apt install pgadmin4-desktop
    

    o Install for web mode only:

    sudo apt install pgadmin4-web
    

    Configure the webserver, if you installed pgadmin4-web:

    sudo /usr/pgadmin4/bin/setup-web.sh
    

    Now if you skipped step 4, we need to do the following (here using postgres as default user). On your terminal run

    sudo -u postgres psql
    

    Once you are inside psql (postgres=#)

    ALTER USER postgres WITH PASSWORD 'yourpassword';
    quit
    

    On your desktop, search for pgAdmin4

    b9146fd7-36ab-4822-90b0-06de7a61f77c-image.png

    Wait for some minutes for it to start, you should then be presented with the following window
    a4709caa-b445-4326-a0c6-99681409d92a-image.png

    On the Top-Left right click on Servers > Register > Server

    722648f2-d8eb-447c-b940-e94cbe2381c4-image.png

    Fill out necessary information. In the Name field under general, i write localhost

    e5c940b1-234d-4fc3-9689-659458483841-image.png

    Under Connection tab, in the Host name/address field, i write localhost (since im using it locally), i leave the rest with their defaults for this case. In the password field, put in your password created at step 9, then click on 'Save' button at the bottom right corner of the popup window.

    90e0cf55-033a-4cb1-9cc9-210e71ca98ed-image.png

    Now you should be presented with this nice view of pgAdmin4

    ed136174-a809-460e-8c8d-e37ec42e3567-image.png

    For now, this should get you up and running!

    I hope this steps have helped you gain some knowledge on installing PostgreSQL on Ubuntu OS.

    Thank you for reaching this far!

    If you find any errors, please feel free to comment them below.

    #Tanzania
    #kilimanjaro
    #uhurunaumoja

  • Login

  • Don't have an account? Register

Powered by NodeBB Contributors
  • First post
    Last post
0
  • Categories
  • Recent
  • Tags
  • Popular
  • Users
  • Groups